3‑Point Y‑Turn – How to Make a 3‑Point Turn (Three‑Point Y‑Turn)
The proper way to perform a three‑point‑turn (Y‑turn) maneuver
The 3-point turn (three-point turn), otherwise known as the three-point y-turn or simply a y-turn, is an extremely critical part of the Wisconsin road test (and also in most other states) because it is a dangerous maneuver and can have serious consequences if not properly executed. Many have failed their road tests because of improper execution of this critical maneuver. The good news is, although the instructions below may seem complicated, they will suddenly click in your mind and will come quite naturally after you get some practice.
While studying the following points, try to envision yourself in a car as if you are doing the maneuver. When you are actually in a car executing the 3-point turn, think back and recall these instructions.
The key to this maneuver is accuracy and not speed. So, remember to keep your vehicle moving slowly at all times with your foot over the brake and your hands moving quickly.
PLEASE NOTE: The use of the word "glance" below means exactly that. Do not misinterpret the meaning of the word "glance" for "stare". The rule to remember is a glance is swift and a stare is anything over two (2) seconds. Turning your head back and forth is not enough. You must "see" and be aware of your environment.
Here are the proper instructions for executing the 3-point turn. To prepare yourself for your Wisconsin road test or to improve your driving skills, practice these steps repeatedly.
When executing the 3-point turn, please remember the 3-point turn should only be used on a narrow side street when there is no room to make a U-turn and no other place to turn around such as a driveway.
- When first getting familiar with the 3-point turn, look for a safe place no less than 200 feet from the nearest intersection to pull over. Choose a quiet side street of average width away from driveways, intersections, children playing and any other activity that may complicate the maneuver. Be sure you have at least 500 feet of visibility in both directions and don't attempt this on a curved roadway.
- Signal your intention to pull over and pull over to the curb when it is safe, then stop. Be sure you are away from parked cars on both sides of the street and don't forget to check your mirrors and look over your right shoulder before pulling over.
- After pulling over and coming to a complete stop, engage your left turn signal, check your rearview mirror, your left mirror and then make a sweeping "glance" over your left shoulder. You are looking for oncoming traffic and all activity from the front of your car, to the left, all the way to the back of the car and down the road behind you. Continue to repeat this process until it is safe to begin the 3-point turn.
- When it is safe, ease up off your brake within not more than 2 seconds of your last sweeping glance. If necessary, gently press the gas pedal to get your car moving slowly. Be alert and keep making a sweeping glance up and down the road every 2 seconds.
- As the vehicle begins to slowly move, swiftly turn your steering wheel "almost" all the way to the left then. DO NOT SLAM OR HOLD THE STEERING WHEEL TIGHTLY INTO THE STEERING JAM, AS THIS WILL DAMAGE YOUR POWER STEERING PUMP AND/OR YOUR FAN BELT.
NOTE: Always make sure the car is slowly moving in one direction or the other before turning the steering wheel. If not, you put heavy stress on your fan belt, steering pump, alignment and tires.
- Focus primarily on the point across the street that you want to get to and keep glancing (left, right, left) up and down the street for any signs of traffic or danger. If necessary, gently press the gas pedal to get moving over the crown of the road and immediately cover the brake pedal when the car has enough momentum, as you only want to roll with "just enough" momentum to make it across the street.
- As you approach the opposite curb, press your brake and stop close to but do not touch the curb with your wheels (your bumper may exceed the edge of the curb).
NOTE: By keeping your foot over the brake at all times, you are always at the ready to stop. Your car is only moving a short distance and you don't want to end up in someone's living room by accidentally accelerating.
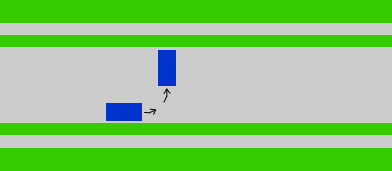
Position of vehicle after completing Point 7
- Immediately upon stopping (in this EXACT ORDER) keeping the brake pedal firmly down, (1.) shift into reverse, (2.) look out the right window for approaching traffic and (3.) then look out the left window for approaching traffic.
- If all is clear and safe, then proceed immediately to step #9.
- If all is not clear and safe, wait until it is and then repeat points 2 & 3 of step #8.
- If a vehicle approaches and stops to allow you to complete the 3-point turn, either continue or motion it to pass. If you choose to continue, be sure to keep an eye on that vehicle, as it may suddenly decide to proceed out of impatience.
- Shift your body to the right as best as you can and include a sweeping glance out the right window again, grab the back of the passenger seat with your right hand, get your head pointed at the entire rear window and look to see when it is safe to begin moving backwards. Remember, you want to see the entire rear window.
- You may disconnect your seatbelt at this point if necessary. However, after completing the 3-point turn you will need to include #16.
- If you have a difficult time getting turned towards the rear window, do as best as you can. If you must steer with both hands, then do so. The important thing is to get your eyes focused out the entire back window during this portion of the 3-point turn.
NOTE: After executing step #9, you have 2 seconds to begin executing step #10 if it is safe. If you do not execute step #10 within 2 seconds of executing step #9, you will have to scan up and down the roadway in both directions again before moving on to step #10. That is because it only takes 2 seconds for the traffic situation or your environment to change.
- Ease up off the brake and slowly roll backwards. If necessary, gently squeeze the gas pedal to get moving and then immediately get your foot back over the brake pedal again. Remember, keep glancing up and down the street every 2 seconds.
- As the vehicle begins to roll backwards, swiftly turn the steering wheel with your left hand (starting from the top of the steering wheel) almost all the way to the right. REMEMBER, DO NOT SLAM OR HOLD THE STEERING WHEEL TIGHTLY INTO THE STEERING JAM! Make adjustments on the steering wheel to try and end up at approximately a 45° angle to the curb. (See illustration below.)
Again, always make sure the car is slowly moving in one direction or the other before cranking the steering wheel. If not, you put heavy stress on your fan belt, steering pump, alignment and tires.
- With your eyes primarily focused out the rear window, keep glancing up and down the roadway every 2 seconds.
- As you get close to the curb or when your right front tire is approximately even (give or take a little) with the center of the road, squeeze the brake pedal and stop before touching the curb with your back tires. Be watchful of trees, fire hydrants, light poles, children, pedestrians etc. KEEP YOUR EYES FOCUSED OUT THE BACK WINDOW UNTIL THE VEHICLE STOPS MOVING COMPLETELY!
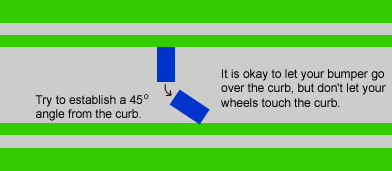
Position of vehicle after completing Point 13
- Immediately upon stopping (in this EXACT ORDER) keeping the brake pedal firmly down, (1.) turn your head and the trunk of your body to the front, (2.) shift into drive, (3.) get your hands in the proper steering position, (4.) look to the left and right for traffic and if all is safe and clear (5.) then look left to the lane you are going to aim at.
- If all is clear and safe, proceed to step #15.
- If all is not clear and safe, continually repeat points 4 & 5 of step #14 until it is safe then move on to step #15.
- In this exact order, (1.) ease off the brake pedal, (2.) cover the gas pedal and gently accelerate,(3.) with the exception of your 2 second glances, keep your eyes primarily focused on the lane you are aiming at (4.) and as the vehicle begins to move, using hand-over-hand steering, aim towards your lane. Then, unless you need to go to point #16, as per sub-point #9, accelerate to the proper speed limit as you enter the proper lane.
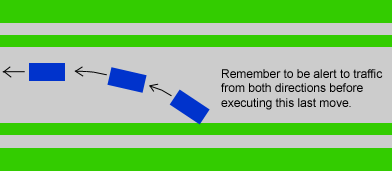
Direction of travel after completing Point 15
- If you disconnected your seatbelt during the 3-point turn, you must signal right after entering the proper lane, check your mirrors, glance over the right shoulder and pull over to the curb when it is safe and reconnect your seatbelt.
Now, after practicing these steps in a real car with a licensed driver or professional instructor, return to this page and review the above points right after you've finished driving. The above points will make more sense and become easier to comprehend and remember.
Remember, the rule of thumb is to keep the car moving slowly with only a gentle nudge on the gas pedal as needed (foot predominantly over the brake) and the hands steering quickly. NEVER TURN THE STEERING WHEEL ALL THE WAY IN EITHER DIRECTION AND HOLD IT TIGHTLY AGAINST THE STEERING JAMS.
SLOW WITH THE CAR - FAST WITH THE HANDS.
Good luck and safe motoring to you from Arcade Drivers School.
Discover the Path to Driving Excellence with Experienced Instructors
Unlock your driving potential by exploring a wealth of resources and information. Start your journey with these essential pages:
Explore Our Informative Website
- Home - Comprehensive driver education programs.
- Teen Programs - Driver education for teens.
- Adult Programs - Driver training for adults.
- About Us - Commitment to excellence in driver training.
- FAQs - Answers to common questions.
- Classroom Locations - Find a convenient location.
- Service Areas - Check our coverage.
- Failure to Yield Course - Get your license reinstated.
- DOT Resources - Information on becoming a licensed driver.
- Parent Care Program - Empower your teen's driving success.
- Get the Big Picture - Learn safe driving habits.
- Defensive Driving Strategies - Become a secure driver.
- Proactive Driving Safety Guidelines - Master proactive driving strategies.
- Maintaining a Safe Distance - Reduce the risk of collisions.
- Safety Guidelines for Drivers - Essential safety tips.
- Maintain an Exit Strategy - Handle driving emergencies.
- Managing Driving Distractions - Control distractions for safer journeys.
- Car's Emergency Kit Essentials - Be prepared for any situation.
- Avoid Common Driving Mistakes - Safer driving experience.
- Seat Belts: A Lifesaver - Understand the importance of seat belts.
- Boost Your Fuel Efficiency - Enhance your vehicle's gas mileage.
- Dealing With Tailgaters - Handle tailgaters safely.
Reach out to us today at (414) 328-1212 to kickstart your driving lessons with Arcade Drivers School.
Arcade Drivers School is Licensed by the State of Wisconsin Department of Transportation

Member in Good Standing - Driving School Association of the Americas